 By Graham Fisher
Red kite embrace baby carrier instructions come down to a short, repeatable process: size the carrier to your body, set the straps and buckles correctly, bring your baby in with the right position, and then check the fit before you walk away. Once you know that sequence, the Embrace (a soft structured carrier made by Red Kite) becomes quick to use and comfortable for long stretches. This guide walks through each stage, along with the checks that keep your baby’s airway clear and their hips positioned well.
What You Need Before You Start
Before you put the carrier on, gather a few basics and clear some space. A flat, open area such as a bedroom floor or a bed works well for your first few attempts, since you can lean forward and check your work without juggling your baby.
Shopping for one? See our guide: Baby Bjorn Baby Carrier Review: Pros and Cons.
- The Embrace carrier with its included insert, if your model uses one for small babies
- Your baby, dressed in light layers so their body stays flexible and comfortable against yours
- A mirror, so you can see the straps and the height of your baby’s head
- Enough time to practice without a deadline, ideally during a calm part of the day
Manufacturers generally specify minimum and maximum weight ranges for each carry position, and these limits can differ between product versions. Check the label and the printed manual that came with your carrier before you begin, and follow whatever weight and age limits are listed for the position you plan to use.
Step 1: Adjust the Carrier to Fit You
A proper fit is the foundation for every other step. If the carrier sits too low, too high or too loose, your baby will feel unstable and your back will feel the strain.
- Loosen all the straps so the carrier hangs open and you can slide it on easily.
- Put it on as you would a backpack, with the panel resting on your chest and the shoulder straps over your shoulders.
- Fasten the waist buckle and pull the strap so it sits snugly around your natural waistline or slightly below it. The buckle should lie flat and not dig in.
- Tighten the shoulder straps until the carrier feels supported, not pulled forward. Keep the panel high enough that your baby’s weight sits close to your center of gravity.
- Check the crossover straps, if your model has them, so they lie flat across your back and don’t twist.
Sizing checklist
- The waist strap sits at your natural waist, not on your hips or ribcage.
- You can slide one or two fingers under the shoulder straps at the top edge without strain.
- The panel is wide enough that it does not press into your baby’s legs or your own ribs.
- You can bend slightly at the knees without the carrier shifting or riding up.
Step 2: Choose the Right Carry Position
Most soft structured carriers allow front, hip and back carries. For newborns and young infants, the front-facing inward position is the most common starting point, because it keeps the baby close and supports the head and spine.
| Carry position | Typical use | What to check first |
|---|---|---|
| Front inward (facing you) | Newborns and young infants | Baby’s chin is off the chest; you can kiss the top of their head |
| Front outward (facing out) | Older babies who can hold their head steady | Baby’s hips sit in a deep seat, knees bent and spread |
| Hip carry | Toddlers who can sit unassisted | Baby sits high on your hip, with the waist strap secure |
| Back carry | Toddlers who can sit and hold on | Panel covers the baby’s back; straps are tight |
Always confirm the age, weight and head-control requirements printed in the manual for each position. If you are unsure whether your baby meets those requirements, a pediatrician or a certified car seat technician can help you decide.
Step 3: Put Your Baby in the Carrier
For a front carry, the order of operations matters. Loading your baby while the carrier is already on your body keeps them supported throughout.
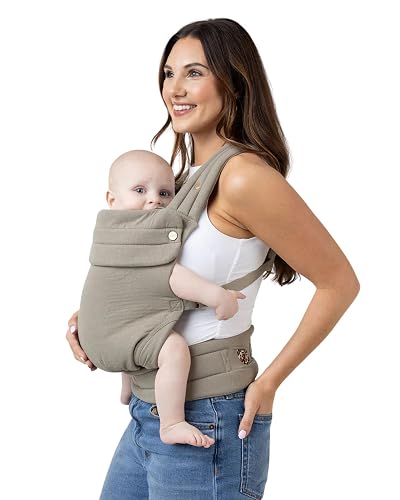
- Open the carrier and place your baby against the panel, with their bottom in the seat and their back against the fabric.
- Bring the panel up so it reaches from their knees to the nape of their neck.
- Tuck their legs into the seat in a frog-leg position, with knees higher than their bottom and bent around the fabric.
- Fasten the straps behind you, starting with the waist and working upward.
- Check that the shoulder straps lie flat on your shoulders, with no twisting.
A helpful habit is to stand in front of a mirror during the first few attempts and watch your baby’s head as you lean forward. The head should stay high on the chest, with the airway open.
Step 4: Check Baby’s Position and Airway
Safe positioning is the most important part of any carry. The widely used TICKS guideline, from the UK’s Lullaby Trust, is a simple way to check your baby repeatedly:
- Tight: the carrier holds your baby close to your body.
- In view at all times: you can see your baby’s face without looking down hard.
- Close enough to kiss: you can lower your head and kiss the top of their head.
- Keep chin off the chest: there is space between the chin and the chest.
- Supported back: the back is supported and upright, not slumped.
Babies under about four months, and any baby with breathing concerns, need extra attention. If you have questions about your baby’s breathing or development, speak with your pediatrician before using a carrier in an upright position.
Step 5: Adjust Hip Position and Leg Spread
Healthy hip development depends on a natural, spread-leg position. When the legs hang straight down with the knees together, the hips are held in a position that can be harmful over time. In the Embrace, the wide seat and the panel should allow your baby’s knees to sit higher than their bottom, with their thighs supported by the fabric.
If you see your baby’s legs dangling or pressed together, loosen the carrier, reposition their bottom deeper into the seat and bring the panel forward to support the knees.
Step 6: Practice Removing and Re-Attaching Your Baby
Learning to take your baby out safely matters as much as putting them in. Lower yourself onto a bed or sofa, keep the carrier in place, and unfasten the straps gradually, supporting your baby with one hand while you loosen the panel. Reverse the process when you want to put them back in. Practicing this a few times when you are calm will make it far less stressful when your baby is fussy.
Common Mistakes
- Loose straps. A carrier that sits loosely lets your baby slump and can shift your center of gravity. Tighten the waist strap first, then the shoulder straps.
- Baby facing inward too low on the chest. If your baby’s head drops toward the chest, lift the carrier and tighten the panel.
- Legs hanging straight. Always check that knees are higher than the bottom and spread around the fabric.
- Using a position beyond the age or weight limit. Follow the manufacturer’s printed guidance for each carry.
- Forgetting to recheck. Babies shift and sag over time. Check the airway, leg position and straps every time you move, and especially after a nap or a long walk.
Tips for Comfortable, Safe Wear
- Wear the carrier on bare or thin clothing so the straps sit flat and you can feel the fit.
- Distribute weight evenly by alternating sides when you use a hip carry.
- Keep a clear line of sight to your baby, and avoid carrying in bulky coats that compress their face.
- Take breaks on long walks. Your back and shoulders will thank you, and your baby will be happier for the change.
- If you are returning to exercise or have a back or hip condition, talk with your physical therapist or doctor about the right carry for you.
For broader guidance on carrier types and how they compare, see Baby Carrier Types: Structured, Wrap, Ring Sling and Backpack. If you are learning a different structured carrier, How to Wear Baby Carrier Safely: A Step-by-Step Guide covers the same general safety checks. Parents who plan to walk with their baby will find useful tips in Walking with Baby Carrier: A Step-by-Step Guide for Comfort and Safety. If you are comparing several soft structured options, Best Baby Carriers: 5 Soft Structured Carriers Compared puts them side by side. For a newborn-focused comparison, Baby Carrier Too Big? 7 Best Carriers for Petite Parents and Small Babies is worth a look when sizing is a concern.
Recommended gear
These items can make your practice sessions easier and your carries more comfortable.
- A full-length mirror. Watching your baby’s head and chin while you move helps you confirm the airway stays open. View on Amazon
- A lightweight, breathable base layer. Thin cotton or bamboo clothing lets the straps sit flat and keeps baby comfortable against your body. View on Amazon
- A rolled towel or small pillow. Useful for supporting a sleeping baby’s head during practice or if you need to sit and reposition. View on Amazon
FAQ
Can I use the Embrace carrier for a newborn?
Many soft structured carriers, including those in the Red Kite line, are marketed for newborns in an inward-facing position, sometimes with an insert. Check the minimum weight and age in the manual, and confirm that your baby can keep an open airway in the carrier.
How do I know the carrier fits me correctly?
The waist strap should sit at your natural waist, the shoulder straps should lie flat without digging in, and you should be able to bend at the knees without the carrier shifting. If anything feels off, loosen the straps and start over.
How often should I check on my baby while carrying?
Check frequently, especially in the first few weeks. Use the TICKS guideline each time you move, after you sit down and after any change in position, and look at your baby’s face and airway regularly.
What is the correct leg position for a front carry?
Your baby’s knees should sit higher than their bottom, with legs spread and supported by the fabric. Avoid any position where the legs dangle straight down with the knees together.
When can I switch to a forward-facing or hip carry?
Only once your baby can hold their head steady and meets the age and weight requirements listed in the manual for that position. Many parents wait until their baby has solid head control, but confirm the guidance with your pediatrician.
How do I take my baby out of the carrier safely?
Sit on a soft, stable surface, loosen the straps gradually, and support your baby with one hand while you open the panel. Lift them out slowly. Practicing this when you are calm makes it easier when your baby is fussy.
Should I consult a professional before using the carrier?
Yes, especially if your baby was born early, has breathing or reflux concerns, or has a hip condition. A pediatrician or a certified car seat technician can help you confirm the right position and fit for your child.
Conclusion
Red kite embrace baby carrier instructions follow a clear path: fit the carrier to your body, choose the position that matches your baby’s development, load and secure your baby, and check their airway and legs every time you move. Practice in a calm setting, watch your baby’s face in a mirror, and recheck after every nap or long walk. Following these steps will give you a safer, more comfortable carrier routine for both of you.
Ready to choose one?
About Graham Fisher
Graham Fisher is part of our editorial team and reviews and edits our baby gear guides, checking product details against manufacturer specifications and owner feedback.









Write Your Review
No reviews yet. Be the first to share your experience!