 By Graham Fisher
This guide shows you how to wear baby carrier designs safely, from setting up a soft structured carrier to positioning your baby correctly and checking the fit before you walk out the door. Most of the work happens before the baby goes in: adjusting the straps, setting the height, and confirming the carrier matches your baby’s size. Once you know that sequence, putting a carrier on takes about a minute once you’ve practiced a few times. For a deeper look, Kangaroo Baby Carrier Newborn: 6 Best Picks Compared (2026) covers this in detail.
What You Need Before You Start
You don’t need much to get started, but a few preparations make the first few tries go smoothly. Gather these items before you put the carrier on: DIY No Sew Ring Sling Baby Carrier: 6 Best Picks Compared (2026) goes further into this.
- The carrier’s instruction manual or the printed fit guide, which lists the minimum and maximum weight, the newborn insert requirements, and any position limits.
- A supportive pair of shoes and a clear, flat space, such as a bedroom floor or a carpeted room, for the first practice run.
- A baby who is calm, fed, and has a dry diaper, so you aren’t adjusting the carrier while you’re also soothing a fussy baby.
- A mirror, so you can check that the straps sit evenly and the baby is positioned correctly.
- A spotter or second adult for your first few times, especially if you are carrying a newborn or using a wrap.
Check the age and weight range before you buy or borrow a carrier. Manufacturers often set a minimum weight for newborn use, and some models require an infant insert for babies who are still small. If the label and manual differ, follow the manual, and check with your pediatrician if you have questions about your baby’s readiness.
Step-by-Step: Put On a Soft Structured Carrier
Soft structured carriers, sometimes called SSCs, are the most common type for everyday use. They have a padded waist belt, shoulder straps, and a buckle system. For more background on the main carrier types, see Baby Carrier Types: Structured, Wrap, Ring Sling and Backpack.
Step 1: Adjust the Carrier Before Wearing It
- Loosen all straps completely. Set the waist belt on your hips, not your natural waist. The belt should sit at or just above your hip bones.
- Open the buckles and pull the shoulder straps out to their longest setting.
- If the carrier has an infant insert, attach it according to the manual and check that the insert sits snugly against the body panel.
Step 2: Get the Baby Into Position
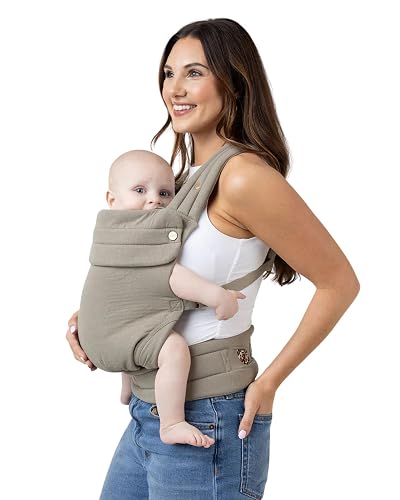
- Hold the baby against your chest, facing you for a front carry, with their legs in a natural “M” shape. Their knees should sit higher than their bottom, and their hips should be spread apart with the thighs supported.
- Lower the baby into the carrier while you keep one hand supporting the head and neck. Slide the baby into the pouch or panel so the body is close to your chest.
- For a newborn, make sure the baby’s chin is off the chest and the airway is open. The baby’s head should be visible and easy to kiss without leaning forward.
Step 3: Fasten and Tighten
- Snap or buckle the waist belt first. Tighten it so the carrier sits on your hips and doesn’t slide when you bend or walk.
- Pull the shoulder straps up and tighten them so the baby’s weight rests on your hips instead of your shoulders and upper back.
- Adjust the height. For a front carry on a newborn, the top of the baby’s head should be at or just below your chin. Older babies may sit a little higher, but check that you can still see the baby’s face.
- Check the leg openings. The fabric should reach the back of the baby’s knees and support the thighs without pressing into the groin area.
Choosing a Carry Position
Once you know the basic front carry, you can explore other positions. Not every position suits every baby, and manufacturers usually set age or head-control requirements. The table below summarizes the most common options and what to check before you use them. If you want more background, see Baby Carrier Bag for 4 Month Old: How to Choose and Pack One (2026).
| Carry position | Typical stage | Best for | Key check |
|---|---|---|---|
| Front inward-facing | Newborn and up, within the carrier’s weight range | Close bonding, feeding on the go, most everyday walks | Chin off chest, face visible, knees above bottom |
| Front outward-facing | Usually after solid head and neck control | Watching the world, older babies who want to look around | Hips seated in the carrier, and the baby’s back supported. Many manufacturers advise against this for newborns. |
| Hip carry | Usually after solid head and neck control and when the baby can sit up unassisted | Toddlers who want to climb on and off | Carrier stays snug, baby’s legs straddle your hip |
| Back carry | Usually after the baby can hold their head up and sit up well | Longer walks and hikes, toddlers | Carrier fit and load-bearing belt, especially on uneven ground |
If you’re deciding between styles, the fit guide in Soft Structured Carrier Fit Guide walks through torso sizing and strap adjustments in more detail. Hiking backpacks for older babies are covered in Hiking Backpack Carrier Guide.
Using a Wrap or Ring Sling
Wraps and ring slings work differently. They offer a snug, adjustable fit but take more practice to tie or thread correctly. The steps below apply to a common front wrap style. Always follow the specific instructions that come with your wrap or sling. If you want more background, see Little Lite Baby Carrier Picks: 7 Best Options Compared (2026).
Wrap Basics
- Center the wrap on your back with the middle bar or fabric at your upper back, and bring the tails around to the front.
- Tie the first knot at your waist so the wrap sits firmly across your torso.
- Hold the baby upright against your chest, then slide them into the pocket of fabric. The baby’s bottom should sit low, with knees above the bottom and the fabric supporting the back.
- Pull the fabric up to the baby’s shoulders, then tighten each layer. Your baby should feel tucked in, not squeezed.
Ring Sling Basics
- Place the sling over one shoulder with the rings at the top of your chest, not near your neck.
- Pull the fabric through the rings to create a pocket that sits at the level of your chest.
- Place the baby in the pocket with their head near the top edge, and check that the fabric covers their back and supports their bottom.
- Tighten the fabric so the baby is snug. Ring slings are a good choice for quick wear, but you should check the tension often, especially in the first few weeks.
Safety Checks Every Time
Babywearing safety rests on a few simple checks, and you should run through them every time you put the carrier on. The TICKS checklist is a widely used memory aid in babywearing guidance: Worth reading next: Cheap Tactical Baby Carrier: 5 Best Budget Picks for Dads (2026).
- T: Tight. The baby should be held snugly against your body, not hanging loosely.
- I: In view at all times. You should be able to see the baby’s face without looking down through a gap.
- C: Close enough to kiss. The baby’s head should be near enough that you can kiss the top of it without bending.
- K: Keep chin off chest. A baby’s chin pressed into the chest can restrict breathing.
- S: Supported back. The baby’s back should be supported in a natural position, not slumped or pressed forward.
Check the baby every time you move, adjust straps, or change position. Babies can slip down in a carrier without warning, especially after you bend or sit. If your baby has breathing concerns, a health condition, or you are unsure whether a position is safe, consult your pediatrician or a certified babywearing educator before you continue.
Common Mistakes
- Carrying the baby too low. A carrier that sits below your natural waist can strain your lower back and let the baby slump. Keep the belt on your hips and the baby high on your chest.
- Leaving straps loose. Loose shoulder straps push the weight forward and make the baby sag. Tighten the straps so the weight sits on your hips.
- Skipping the chin check. A baby’s chin pressed into the chest is a real concern, especially for newborns. Lift the baby slightly if you see the chin dropping.
- Using an outward-facing position too early. Many manufacturers advise against this until the baby has solid head and neck control. Check the manual before you try it.
- Forgetting to re-tighten. Carriers loosen over time as you walk. Re-check the fit after every few minutes and after you move.
- Carrying a baby over the weight limit. Exceeding the stated maximum weight affects the carrier’s stitching and support. Check the label before each use.
Tips for Better Carrying
- Practice at home first, with a bag of similar weight if you don’t yet have a baby, and then with the baby while someone else is nearby.
- Learn to put the carrier on in a consistent order: adjust, load, fasten, tighten, check. Consistency reduces mistakes when you’re tired.
- Dress for the weather. Layers you can remove are useful because the baby’s body heat adds to yours. For warm-season guidance, see Babywearing in Hot Weather: Carriers, Fabrics and Precautions.
- Keep a spare diaper and a light blanket in your bag so you don’t need to remove the carrier to fix a minor problem.
- If you are buying a new carrier, compare the models in Best Baby Carriers: 5 Soft Structured Carriers Compared to see how the features differ.
- If you’re packing for a trip, the planning ideas in Baby Travel Gear Guide: Flights, Road Trips and Hotels can help you decide whether a carrier, stroller, or both makes sense.
Recommended gear
These product types are useful for most families who are learning this skill. Check each one against the baby’s current weight and the manufacturer’s age guidance before buying. For a deeper look, Baby Carrier Folding Bike Options: 5 Best Picks Compared (2026) covers this in detail.
- A soft structured carrier with a newborn insert gives you a front-carry option for young babies and a broader weight range as your child grows. Check price on Amazon
- A stretchy or woven wrap helps you learn a snug, adjustable fit for newborns, though it takes practice to tie consistently. Check price on Amazon
- A lumbar-support hip belt or padded waist belt can reduce strain on your lower back during longer walks. Check price on Amazon
FAQ
When can a baby face outward in a carrier?
Most manufacturers recommend outward-facing positions only after the baby has solid head and neck control, and many advise waiting until the baby can sit up with support. Check your carrier’s manual for the exact age or weight guidance.
How do I know the carrier fits me correctly?
The waist belt should rest on your hips, the shoulder straps should be snug without pulling forward, and the carrier should not slide when you bend. If you feel strain in your back or shoulders, adjust the belt position first. A fitting guide or local babywearing group can help you check.
Is it safe to wear a newborn in a carrier?
Many carriers have specific requirements for newborns, including an infant insert and a minimum weight. Follow the manual, keep the baby’s chin off the chest, and check the airway often. If you have concerns about your newborn’s breathing or health, speak with your pediatrician before you start.
How often should I check on my baby while wearing them?
Check often, especially after you move, bend, or adjust the straps. Use the TICKS checklist each time, and confirm the baby’s face is visible and their chin is not pressed down. Babies can slump in a carrier without warning, so frequent checks help prevent problems.
Ready to choose one?
About Graham Fisher
Graham Fisher is part of our editorial team and reviews and edits our baby gear guides, checking product details against manufacturer specifications and owner feedback.









Write Your Review
No reviews yet. Be the first to share your experience!