 By Graham Fisher
Updated November 2026
The ergo sport baby carrier is a soft, structured carrier designed for active parents who want to keep a baby close during walks, errands and light outdoor activity. This guide walks you through how to check the fit, set up the carrier correctly for your baby’s age and size, and avoid the mistakes that cause discomfort for both of you. By the end, you should be able to put it on, adjust it in under a minute, and know when to stop and reposition.
What the ergo sport baby carrier is designed for
Most carriers in this category are built around a padded waistband, two shoulder straps and a seat panel that supports the baby’s legs in a spread-squat position. The sport version typically emphasizes a more streamlined profile and lighter materials than a full-featured everyday model, so it suits parents who move quickly, wear the carrier for longer stretches, or spend time outdoors. Manufacturers generally specify a minimum and maximum weight for the carrier, along with a range of baby heights. Check those numbers on the packaging or the manufacturer’s site before you buy or use a secondhand unit, because they determine when the carrier is safe for a newborn and when your child has outgrown it.
Shopping for one? See our guide: Ergo Baby or Baby Bjorn Carrier (2026): Which Is Better for Daily Use?.
Key specs to check before you use it
- Minimum and maximum baby weight: Confirm the lower limit before using it with a newborn, since some carriers require an insert or are only approved from a certain weight.
- Waist range: Most manufacturers list a waist measurement range. A poor match here is the most common reason for a carrier that feels loose or sits too high.
- Carry positions: Confirm whether the model supports front-inward, hip and back carry, and whether a front-outward setting is recommended for your baby’s age.
- Seat width and depth: The seat should reach from knee to knee with the baby’s knees slightly higher than their bottom.
Step 1: Measure yourself and your baby
Before you fit the carrier, take two measurements. First, measure your natural waist, which is usually the narrowest part of your torso above the hips. Compare that number to the waist range in the manufacturer’s sizing chart. Second, note your baby’s current weight and length. Weight tells you whether the carrier is rated for them, while length helps you judge whether the seat will support their legs properly.
Checklist before the first use
- Confirm the carrier’s weight and height limits match your baby.
- Check that your waist measurement falls inside the printed range.
- Inspect all buckles, webbing, stitching and fabric for fraying or damage.
- Read the instruction booklet, especially any section on newborn use or inserts.
- Practice putting the carrier on with an empty weight or a doll before adding your baby.
Step 2: Adjust the carrier to fit your body
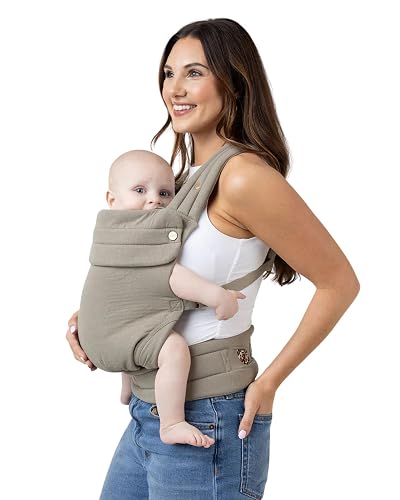
A carrier fits best when the waistband sits on your hips rather than your waist, and when the baby sits high on your chest. Start with the waistband fully loose, buckle it, then tighten it so the padding rests on your hip bones. The shoulder straps should lie flat without gapping at the top. If you feel pressure on your neck or shoulders, the waistband is likely too high or the straps too tight.
Sub-steps for a secure fit
- Tighten the waist strap first, then the shoulder straps, and finally the chest strap if the model has one.
- Pull the straps evenly on both sides so the carrier does not sit crooked.
- Check the height of the baby’s head. It should be high enough that you can kiss the top of their head without leaning forward.
- Keep the carrier snug enough that the baby does not slump, but not so tight that their chin is pressed into their chest.
Step 3: Set up the baby for the right position
Once the carrier is on, bring your baby in with their legs in a natural spread-squat, often called the M position. The baby’s knees should sit at or slightly above their bottom, and the seat panel should support the back of the thighs from knee to knee. Their spine should stay curved and supported rather than pushed into a straight line. For newborns, a front-inward carry with the baby’s face visible and close enough to kiss is typically recommended, and the carrier should be snug enough that you can see their face at all times.
Positions and when to use them
| Position | Typical baby age | What to check |
|---|---|---|
| Front-inward (facing you) | From newborn, when approved by the manufacturer | Chin off chest, face visible, airway clear |
| Front-outward (facing out) | Usually after the baby can hold their head steady | Hips supported, seat not too wide, baby upright |
| Hip carry | Usually toddler age, once sitting independently | Seat fully under the baby, straps secure |
| Back carry | Typically after the baby can sit unsupported | Shoulder straps snug, baby high on the back |
Always check the manufacturer’s age guidance for each position, because recommendations differ by model. If you are unsure whether your baby is ready for an outward-facing or back position, a certified car seat technician or pediatric professional can help you judge readiness.
Step 4: Check the baby’s airway and comfort
Safe babywearing depends on keeping the airway clear. Use the TICKS guide as a quick reminder: the baby should be in view at all times, the head should be close enough to kiss, the chin should be off the chest, the body should be in an upright position, and the knees should be in a spread-squat. Recheck this every time you adjust the carrier or your baby shifts position, and again after you sit down, since sitting can change the fit. If the baby’s face is pressed against the fabric or their breathing sounds labored, reposition them immediately.
Common mistakes
- Wearing the waistband too high: This shifts weight to your shoulders and makes the baby sit too low on your body.
- Letting the seat dangle: A narrow seat that does not reach the knees puts pressure on the baby’s hips and legs.
- Skipping the newborn insert: If the manufacturer requires an insert for small babies, using the carrier without it can leave the baby slumped.
- Not rechecking after movement: Babies settle and shift, and straps loosen over time.
- Ignoring wear on the webbing: Frayed straps or worn buckles should be retired, not patched.
Tips for longer wear
- Take a break every 30 to 60 minutes to stretch and let your back recover.
- Distribute the baby’s weight by moving them to hip or back carry on long walks.
- Keep a spare layer of clothing for the baby so you can adjust warmth without unbuckling.
- Store the carrier flat or hung, away from heat and direct sun, which can weaken fabric over time.
Recommended gear
A few accessories can make the ergo sport baby carrier more comfortable, particularly for longer outings. Choose items that match your baby’s age and your carrying style.
- Newborn insert or head support: Helps keep a small baby’s head and body supported when the manufacturer requires it. View on Amazon
- Lumbar or hip padding cover: Adds extra cushioning under the waistband for long walks and heavier toddlers. View on Amazon
- Breathable carrier liner: Reduces sweat and friction in warm weather. View on Amazon
FAQ
Can I use an ergo sport baby carrier for a newborn?
It depends on the model and the baby’s weight. Check the manufacturer’s minimum weight and any requirement for a newborn insert. If the carrier is not rated for your baby, use a model designed for newborns instead.
How do I know if the carrier fits me correctly?
The waistband should sit on your hips, the shoulder straps should lie flat, and you should not feel pressure on your neck. Your waist measurement should fall inside the manufacturer’s listed range.
When can my baby face outward?
Front-outward carrying is usually recommended once a baby can hold their head steady and sit upright with support. Follow the manufacturer’s age guidance, and consider asking a pediatric professional if you are unsure.
How often should I check my baby’s position?
Check every time you put the carrier on, after you adjust it, after you sit down or stand up, and at regular intervals during a long walk. Babies can slump or shift without warning.
Is it safe to wear the carrier while exercising?
Some parents do light walking or stroller-free errands while wearing a carrier, but vigorous exercise can shift the baby and loosen straps. Consult your pediatrician or a physical therapist before doing high-impact activity, especially after pregnancy.
How do I clean the carrier?
Follow the care label. Many models can be hand-washed or machine-washed on a gentle cycle, but some parts may need to be spot-cleaned. Air dry the carrier away from direct heat.
How long can I wear the carrier each day?
There is no universal limit. Take breaks to stretch, and stop if your back, shoulders or hips become painful. Persistent pain is worth raising with a physician or physical therapist.
Conclusion
The ergo sport baby carrier works well when you match it to your baby’s weight, your waist size and the right carrying position for their age. Measure first, adjust the waistband onto your hips, and recheck your baby’s airway and posture every time you move. With those steps in place, the carrier becomes a comfortable, practical tool for everyday walks and outings.
Related reading
- Tula Explore Baby Carrier vs Ergo 360: Which Fits Your Baby Better?
- Ergo Baby Carrier Black Friday Sale: How to Spot Real Deals and Buy Smart
- Ergo Baby Carrier Adapt Front Facing: Safe Setup Steps for Babies
- Ergo Baby Carrier Accessories: 7 Add-Ons That Make Wearing Easier
- Ergo Baby Carrier 7 Week Old: Safe Setup, Fit and Positions Guide
- Ergo Baby Carrier 360 Cool Air Mesh: Fit, Safety and Setup Guide
Ready to choose one?
About Graham Fisher
Graham Fisher is part of our editorial team and reviews and edits our baby gear guides, checking product details against manufacturer specifications and owner feedback.








Write Your Review
No reviews yet. Be the first to share your experience!