 By Graham Fisher
Updated November 2026
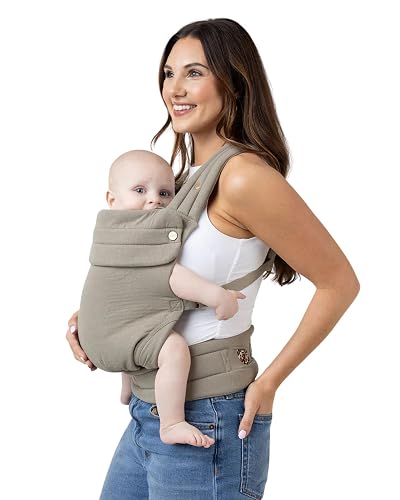
A líllé baby carrier front facing setup can be comfortable for both parent and baby when it is fitted and used correctly. This guide walks you through checking your carrier, choosing when front-facing makes sense, fitting the straps, and positioning your baby so their airway stays clear and their hips stay supported. By the end, you will have a clear routine you can repeat every time you buckle in.
Front-facing carrying has a few well-known trade-offs. Babies can see the world and watch your face, which many enjoy, but the carrier also places more weight on your front and can make it harder to keep the baby upright and supported if you are not careful. Taking time with the setup pays off.
Before You Start: Check Whether Front-Facing Suits Your Baby
Front-facing positions are generally recommended only once a baby has enough head and neck control to hold their head steady and has the body size the carrier’s instructions specify. Manufacturers usually state a minimum weight and height for front-facing use, and many also specify that the baby should be able to sit with support. Check the manual that came with your carrier before anything else, because limits differ between models.
Newborns generally do better in an inward-facing or hip position, where the baby’s spine stays curved and their face stays visible to you. Many parents switch to front-facing once their baby can hold their head up well, often somewhere in the first several months, but the exact timing depends on the individual child and the product’s stated limits.
If you are unsure whether your baby is ready, consult your pediatrician or a certified baby carrier consultant before using the carrier in a new position.
Step-by-Step: Setting Up a líllé Baby Carrier for Front-Facing Use
Step 1: Gather the Right Tools and Check the Carrier
Before you begin, lay the carrier out on a flat surface and inspect it. Look for:
- Intact stitching at all stress points, especially where the straps meet the body panel.
- Working buckles that click fully closed and do not slip under light tension.
- Straps that are not twisted, frayed, or stretched out.
- Labels and instructions that match your carrier model and your baby’s size range.
Also keep a mirror nearby or a second person to help you check the baby’s position the first few times.
Step 2: Adjust the Carrier to Your Body
Fit the carrier to yourself before putting your baby in. Set the waist strap so it sits on your natural waist or slightly below, and tighten the shoulder straps so the carrier sits high enough that the baby’s head can rest comfortably, but not so high that the baby’s head is pressed into your chin. Many parents find it easier to adjust the carrier while standing in front of a mirror.
Step 3: Position the Baby Facing Forward
Lift the baby with their legs in the seat and their bottom low, so their knees sit slightly higher than their bottom. This creates the “M” position that supports healthy hip development. Keep the baby’s back supported and their spine as natural as possible. Do not let the baby’s legs dangle straight down, and do not let the seat panel push their knees together.
Step 4: Secure the Baby and Check the Airway
Once the baby is in place, fasten the buckles and tighten the straps so the baby is snug against your body. The baby should feel secure without being squeezed. Check the airway with the following rules of thumb:
- Keep the baby’s chin off the chest, leaving at least a finger’s width of space.
- The baby’s nose and mouth should be clear of fabric.
- Be able to kiss the top of the baby’s head without bending your head too far down.
Step 5: Do a Test Walk and Adjust
Walk around for a few minutes and check the carrier after each adjustment. Tighten straps if the baby sags, and loosen them if the baby is pressed uncomfortably. Watch the baby’s color and breathing, and look for signs of fussiness. A baby who is calm, breathing easily, and watching the world is usually well positioned.
Front-Facing Position Comparison
The table below summarizes how front-facing compares with other common carrying positions. Specifics vary by model, so always verify with your carrier’s manual.
| Position | Typical Age Range Noted by Manufacturers | What the Baby Sees | Key Setup Check |
|---|---|---|---|
| Inward facing / hip | Newborn and up | Parent’s chest | Spine curved, chin off chest |
| Front facing outward | Often after head control is established | The world ahead | Hips supported, legs in M position |
| Back carry | Often after sitting independently | Over parent’s shoulder | Secure leg straps, head support |
Common Mistakes to Avoid
- Starting front-facing too early. Wait until your baby meets the product’s stated weight and head control guidance.
- Leaving the carrier loose. A loose carrier shifts weight and can drop the baby’s head forward.
- Letting the baby slump. Slumping can narrow the airway, so keep the baby upright and close.
- Ignoring the hips. Dangling legs with a flat seat do not support healthy hip development.
- Skipping checks. Buckles and straps can loosen over time, so check them every time you put the carrier on.
Tips for Comfortable Front-Facing Carries
- Keep the baby’s hands free to explore, as long as the arms are not caught in the straps.
- Try short carries first, around 15 to 20 minutes, before longer outings.
- Use a light layer over the baby to block sun or wind, leaving the face clear.
- Switch sides or positions if your back or shoulders start to ache.
- Remove the carrier with the baby still supported, lifting them out with a hand under the bottom.
Recommended gear
Several accessories can make front-facing carries easier to manage. Look for items that help with support and comfort rather than anything that changes the carrier’s structure.
- Lumbar support insert for carriers: A padded insert can help distribute the baby’s weight across your lower back during longer walks. Search: View on Amazon
- Infant head support pillow: Some parents use a supportive insert for very young babies, but check the carrier’s manual first to make sure accessories are allowed. Search: View on Amazon
- Sun and wind cover for carriers: A lightweight cover can shield the baby from sun and breeze while keeping the airway clear. Search: View on Amazon
For a broader look at carrier styles and how they compare, see 7 Best Front and Back Facing Baby Carriers Compared (2026) and Ergonomic Outward Facing Baby Carriers: 7 Best Picks Compared (2026). If you are weighing different brands for front-facing use, Tula Explore Baby Carrier vs Ergo 360: Which Fits Your Baby Better? compares two popular options. Parents who are also planning outdoor carries may find Walking with Baby Carrier: A Step-by-Step Guide for Comfort and Safety useful.
FAQ
When can I start using a líllé baby carrier front facing?
Check the carrier’s manual for the stated minimum weight and head control requirements. Most front-facing use begins only after the baby can hold their head steady and sit with support, and the baby should meet the product’s size range.
Is front-facing better than hip carry for newborns?
For newborns, most manufacturers and pediatric sources recommend an inward-facing or hip position because it keeps the spine curved and the airway easier to watch. Front-facing is usually introduced later.
How do I know if the baby can breathe properly?
Keep the chin off the chest with at least a finger’s width of space, make sure the nose and mouth are clear, and check that you can kiss the top of the baby’s head without bending too far. Recheck often, especially after the baby moves.
Why does the baby’s position matter for hip health?
Supporting the baby with knees higher than the bottom, in an M shape, helps the hip joints develop in a natural position. A flat seat that leaves the legs dangling can put undue strain on the hips.
How long can I carry my baby front facing?
There is no universal time limit. Many parents start with short carries and build up gradually while watching the baby for comfort and signs of fussiness. Take breaks to stretch, and reposition the baby as needed.
What should I check before every carry?
Check the buckles, straps, and stitching, confirm the carrier fits your body, and verify the baby’s airway and hip position. A quick routine every time helps prevent problems.
Should I talk to a professional before using a carrier front facing?
Yes, especially if your baby has a medical condition, was born early, or has any concerns with hips, breathing, or muscle tone. A pediatrician or certified baby carrier consultant can confirm whether front-facing is appropriate for your child.
Conclusion
Using a líllé baby carrier front facing safely comes down to waiting until your baby is ready, fitting the carrier to your body, and positioning the baby with an open airway and supported hips. Run through the same checks each time, start with short carries, and adjust as you learn what works for your baby. Always follow the manufacturer’s instructions for your model.
Related reading
- Ergo Baby Carrier Adapt Front Facing: Safe Setup Steps for Babies
- Baby Bjorn Carrier One Front Facing: How to Use It Safely and Comfortably
Ready to choose one?
About Graham Fisher
Graham Fisher is part of our editorial team and reviews and edits our baby gear guides, checking product details against manufacturer specifications and owner feedback.









Write Your Review
No reviews yet. Be the first to share your experience!