 By Graham Fisher
Updated November 2026
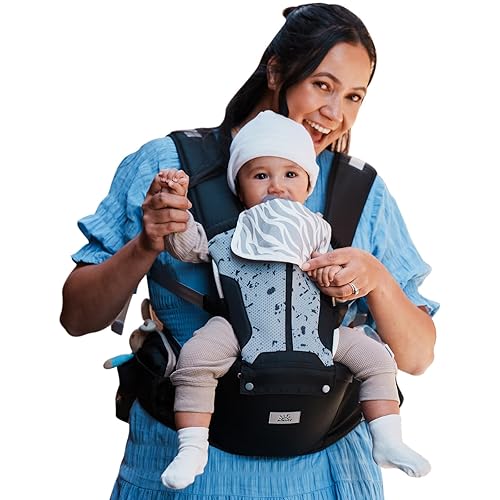
A mothercare 4 position baby carrier grey is a soft, structured carrier designed to hold a baby facing in or out, on the front or the back, depending on the wearer’s needs and the child’s age. This guide walks you through checking the parts, adjusting the straps for a snug fit, and setting up the four main carrying positions safely. By the end, you should be able to put the carrier on alone, confirm your baby is secure, and know the warning signs that a setup needs fixing.
What the “4 Position” Label Means
Carriers marketed as “4 position” usually offer front-inward, front-outward, hip, and back carrying. Not every position suits every baby. Front-inward (facing you) is the most common starting point for newborns and young infants, while front-outward and hip carries are generally better for babies who can hold their head up steadily. Manufacturers typically specify minimum and maximum weight limits and a minimum age or size for each mode, so check the printed instructions that came with your carrier before you begin.
Before You Start: Checklist and Tools
Gather everything before you put the carrier on, so you are not juggling a baby mid-setup.
- The carrier with all buckles, clips and any inserts in place
- The instruction booklet or the manufacturer’s website for your specific model
- A mirror, so you can check the front of the carrier as you adjust it
- A clear, flat surface or a sofa where you can sit and fit the carrier comfortably
- A way to check the baby’s weight range against the label
Inspect the fabric and stitching for fraying, loose seams or broken buckles. If anything looks damaged, stop and contact the manufacturer rather than trying a patch repair.
Step 1: Size the Carrier to the Wearer
Most of the fit problems people report come from skipping this step. Start with the waist strap. It should sit at your natural waist, not on your hips or ribcage, and it should be snug enough that the weight rests on your hips rather than your shoulders. Tighten the shoulder straps next, but leave a finger’s width of slack so you can slide a hand between the strap and your shoulder.
Once the wearer fit is set, do not change it again while the baby is inside. Adjust with the baby out, then re-check after the first carry.
Step 2: Set Up the Front-Inward Position
This is the position most parents use for newborns and young infants. The steps below assume a baby who meets the carrier’s minimum weight and can support their own head.
- Loosen the panel fully and fold the leg openings so they are ready to receive the baby’s legs.
- Hold the baby with one hand under the bottom and one supporting the head and neck.
- Lower the baby into the pouch with their legs in the leg openings and their bottom sitting low and deep, not dangling.
- Pull the panel up and fasten the buckles at the back, keeping the fabric flat.
- Check that the baby’s chin is off the chest and the airway is clear.
Step 3: Move to Front-Outward and Hip Carries
Front-outward carrying faces the baby away from you, toward the world. It puts more strain on your back and offers less head support, so use it only once your baby has strong, steady head control and can sit upright on their own. Hip carries are useful for toddlers who want to look around. In both cases, keep the baby’s spine in a natural curve and make sure their hips are spread into a comfortable “M” shape with knees above bottom level.
Checking the Outward Setup
Once the baby is in, look down at their face. You should see their face and body, with no fabric pressing on their nose or mouth. Their weight should sit close to your body, not pulling you backward.
Step 4: Set Up the Back Carry
Back carries should only be done once your baby is older and can hold their head up without support. Most manufacturers set a clear age or weight threshold here. Practice the setup while sitting down, with the baby placed behind you and the panel brought up over their shoulders. Keep the carrier high and snug on your back, and check that you can still see the baby’s face by turning your head.
Because back carries are harder to check visually, take extra care. Have someone else look at the setup before you walk anywhere.
Safe Positioning: The TICKS Check
Whatever position you choose, use this quick check often. Each letter stands for a point that affects breathing and safety.
| Letter | What to check |
|---|---|
| T: Tight | The carrier holds the baby close, with no slack that lets them slump. |
| I: In view | You can see the baby’s face at all times, without bending down. |
| C: Close enough to kiss | The baby’s head is close enough that you could kiss the top of it. |
| K: Keep chin off chest | There is a gap between the chin and chest for open airway. |
| S: Supported back | The baby’s back is supported in a natural curve, not curled. |
If you are unsure about any step, or your baby has a medical condition such as hip dysplasia or breathing issues, consult a pediatrician or a certified babywearing consultant before you carry.
Common Mistakes
- Letting the carrier sit too low on the waist, which strains the lower back.
- Leaving the baby’s legs dangling straight down instead of spread and supported.
- Forgetting to re-tighten after the baby settles, which lets the carrier sag.
- Using an outward or back carry before the baby has solid head control.
- Carrying in a position where the fabric covers the baby’s face, even briefly.
Tips for Everyday Use
Check the fit each time you put the carrier on, because straps can stretch with use. Store the carrier flat or hung in a dry place to keep the buckles and fabric in good shape. Wash it according to the label, usually on a gentle cycle and air dried, since heat can weaken elastic and fabric over time.
If you are comparing this model with others, our guide to Proper Baby Carrier Position vs Wrong Position: Which Should You Choose? explains how positions affect comfort for both parent and baby. For newborn-specific needs, Mothercare Baby Carrier Newborn Insert: 10 Best Picks Compared covers inserts that can help smaller babies sit safely.
Those who want step-by-step help with the manufacturer’s buckle layout may find Mothercare 4-in-1 Baby Carrier Instructions: A Step-by-Step Guide useful alongside this article. If you are considering a different brand, Ergo Baby Carrier 7 Week Old: Safe Setup, Fit and Positions Guide shows how a similar structured carrier is set up for young infants.
Recommended gear
A fitted accessory can make a real difference to comfort and safety with a structured carrier.
- Newborn insert for structured carriers: A padded insert helps support a very small baby’s head and hips until they reach the carrier’s minimum size. View on Amazon
- Bib or drool cover: Keeps the carrier fabric clean during feeding and teething, which makes washing less frequent. View on Amazon
- Carrier-safe baby mirror: Lets you check the baby’s face in a front carry without twisting around. View on Amazon
FAQ
Can a newborn use a mothercare 4 position baby carrier grey?
Many 4 position carriers are designed for babies from a minimum weight, often around 3.5 kg (about 7.7 lb), but this varies by model. Some require an insert for smaller infants. Check the label and manual for the exact limit.
Which position is safest for a newborn?
Front-inward carrying, with the baby upright and close to your chest, is generally recommended for newborns. Outward and back carries should wait until the baby has solid head control.
How do I know if the baby is breathing safely?
Use the TICKS check regularly. The baby’s face should be visible, their chin should be off the chest, and their airway should be clear. Watch for any change in colour or breathing.
How tight should the straps be?
Straps should feel snug, with the baby held close and no slack. You should be able to slide a finger under the shoulder strap but not a whole hand.
Can I use the carrier for walking or hiking?
Yes, once the baby is old enough for the chosen position. Re-check the fit after each rest stop, since movement can loosen the buckles.
How do I wash the carrier?
Follow the care label. Most fabric carriers are machine washed on a gentle cycle with mild detergent and air dried away from direct heat.
When should I stop using the carrier?
Stop when your baby exceeds the maximum weight or height listed by the manufacturer, or when the straps, buckles or fabric show wear that affects safety.
Conclusion
A mothercare 4 position baby carrier grey works well when you size it to your body, set up each position carefully, and check the baby often using the TICKS guidelines. Start with front-inward carrying, progress to outward and back carries only when your baby is ready, and never skip the fit check. When in doubt about your baby’s readiness or any health concern, ask your pediatrician for guidance.
Ready to choose one?
About Graham Fisher
Graham Fisher is part of our editorial team and reviews and edits our baby gear guides, checking product details against manufacturer specifications and owner feedback.









Write Your Review
No reviews yet. Be the first to share your experience!