 By Graham Fisher
Mothercare 4-in-1 baby carrier instructions walk you through four carry positions: front inward, front outward, hip and back. This guide shows you how to set up the carrier, adjust it to your body, fit your baby into each position and check that the setup is safe before you take a step. Keep the manufacturer’s manual nearby, because straps, buckles and weight limits can differ between model versions.
Before You Start: Check Your Carrier and Gather Supplies
Lay the carrier flat and identify its main parts. Most 4-in-1 soft carriers include a body panel, two shoulder straps, a waist belt with a buckle, a leg or hip panel, and a hood or head support in some versions. Look for a rated weight and age range on the label or tag, and confirm that your baby falls within it.
Shopping for one? See our guide: Mothercare Baby Carrier Newborn Insert: 10 Best Picks Compared.
Checklist of What You Need
- The carrier with all straps, buckles and any inserts included in the box
- A clean, flat surface such as a bed or sofa for practice
- A mirror, so you can check the baby’s position and your posture
- A helper for your first few attempts, especially with a newborn
- The printed or downloaded manual for your specific model
Inspect the Carrier First
Check each seam, strap and buckle for fraying or loose stitching. Confirm that every buckle clicks fully closed and that the straps slide smoothly through their adjusters. If anything looks damaged, stop and contact the manufacturer before use.
Step 1: Adjust the Carrier to Fit You
A carrier that fits you well distributes the baby’s weight to your hips rather than your shoulders. Start with everything loosened, then tighten in this order.
- Put the carrier on with the waist belt around your natural waistline, above your hip bones.
- Fasten the buckle at the front and tighten the waist belt until it sits snug without pinching.
- Pull the shoulder straps up and over your shoulders, then tighten them so the body panel sits high on your chest.
- Check that the bottom of the carrier reaches your baby’s bottom and that you can see the baby’s face clearly.
Measure Your Fit
Once adjusted, you should be able to slide two fingers between the straps and your skin. If the straps dig in, loosen the waist belt slightly and tighten the shoulder straps to move weight downward.
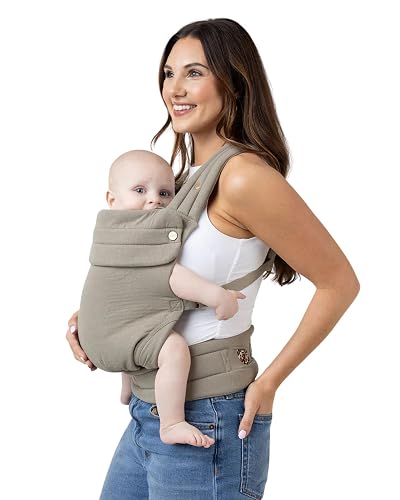
Step 2: Front Inward Carry for Newborns
The front inward position keeps a newborn facing your chest, which supports the head and spine during the first months. It is the position most manufacturers recommend for babies who cannot yet hold their heads up steadily.
- Loosen all straps and open the carrier wide.
- Hold your baby upright against your chest with their head near your chin.
- Slip the carrier under the baby’s bottom and bring the leg panel up so the baby’s legs sit in a natural frog position.
- Tighten the shoulder straps first, then the waist belt, and check the fit again.
- Pull the body panel up to support the baby’s back and head, keeping the chin off the chest.
Airway and Positioning Check
Make sure the baby’s nose and mouth are clear of fabric. The chin should not press into the chest, and you should be able to kiss the top of the baby’s head without bending your neck awkwardly.
Step 3: Front Outward Carry for Older Babies
Front outward mode faces the baby toward the world. Use it only once your baby can hold their head steady and sit upright with support, as most manufacturers specify. Many owners find this position works best after several months of age.
- Start with the baby facing you, then turn them outward while supporting the chest and legs.
- Keep the baby’s legs spread in a frog position and their back against your torso.
- Adjust the leg panel so it reaches the backs of the knees and does not cut into the thighs.
- Re-check the waist belt and shoulder straps, since outward carries often shift the balance of weight.
Step 4: Hip Carry
The hip carry places the baby on one side, with their legs straddling your hip. It works well for short trips and for babies who are already sitting independently.
- Position the carrier with the baby’s seat on your hip, the buckle to your side.
- Seat the baby with their legs wrapped around your waist and their bottom in the seat.
- Bring the body panel up behind the baby to support their back.
- Fasten the buckle and check that the baby is secure and cannot slide down.
Step 5: Back Carry
The back carry moves the baby behind you. Only use it once your baby can sit unsupported, and practice with a helper for the first few attempts because the transfer is harder to see.
- Open the carrier and position it on your back with the body panel high between your shoulder blades.
- With a helper, lift the baby behind you and lower them into the seat.
- Pull the leg panel up and tighten the shoulder straps, then the waist belt.
- Check that the baby’s head is level with your shoulders and that you can see their feet.
Safety Checks Before Every Walk
Safe carrying depends on airway clearance and secure fastening. Use this quick routine each time you put the carrier on.
| Check | What to Look For |
|---|---|
| Airway | Nose and mouth clear, chin not touching chest |
| Position | Baby upright, spine curved naturally, legs in frog position |
| Fit | Waist belt above hips, shoulder straps tight, body panel high |
| Buckles | All buckles fully clicked and tightened |
| Baby Weight | Within the rated limit printed on the carrier |
Consult your pediatrician before using any carrier with a newborn or with a baby who has a medical condition, and ask a certified child passenger or carrier fitting specialist if you are unsure about positioning.
Common Mistakes to Avoid
- Carrying the baby too low. A low carry pulls the baby away from your chest and strains your lower back.
- Leaving the chin on the chest. This can narrow the airway, especially in newborns.
- Skipping the fit adjustment. Loose straps cause the weight to hang from your shoulders.
- Using outward or back carries too early. Wait until your baby has the head and trunk control the manual calls for.
- Forgetting to recheck after walking. Babies shift and straps loosen with movement.
Tips for Comfortable Everyday Use
Practice transfers on a bed first, where a fall would be low-risk. Put the carrier on before you pick up the baby so your hands stay free. Keep a spare burp cloth nearby, and take breaks every 20 to 30 minutes to stretch your back and shoulders.
FAQ
What age can I start using the Mothercare 4-in-1 carrier?
Check the age and weight range printed on your carrier, since limits vary by model. Most soft carriers of this type are designed for newborns in the front inward position, with other carries added as the baby grows.
How do I know if the baby is breathing safely?
Keep the baby upright, with the nose and mouth clear of fabric and the chin off the chest. You should be able to see the baby’s face easily without bending your head down.
When can I switch to the front outward carry?
Wait until your baby can hold their head steady and sit upright with support. Follow the milestones in your manual rather than relying only on age.
Can I use the back carry without help?
Most manufacturers recommend a helper for the first several attempts. Practice with a partner until you can transfer the baby safely on your own.
How tight should the straps be?
Straps should feel snug enough that the baby does not sag, with the weight carried mainly by the waist belt. You should fit two fingers between the strap and your skin.
Why does the carrier feel uncomfortable on my shoulders?
The waist belt is probably too loose or sitting too high. Tighten the belt so it rests above your hip bones, then loosen the shoulder straps slightly.
Should I ask a professional about carrier safety?
Yes, especially if your baby was premature, has breathing issues or reflux, or if you have back or hip problems. A pediatrician or physical therapist can confirm a safe setup for your situation.
Conclusion
Mothercare 4-in-1 baby carrier instructions come down to four steps: fit the carrier to your body, choose a carry position suited to your baby’s development, position the baby with a clear airway, and recheck every buckle and strap. Start with the front inward carry, practice on a bed, and move to other positions only when your baby is ready. Read your model’s manual for exact weight limits and buckle details.
Related reading
- Walking with Baby Carrier: A Step-by-Step Guide for Comfort and Safety
- Tushbaby Hip Seat Baby Carrier Review: Pros and Cons
- Tula Bliss Bouquet Baby Carrier: 7 Best Tula Carriers Compared (2026)
- Tula Baby Carrier Comparison: Which Tula Baby Carrier Is Best for You?
- Stretch Wrap Baby Carrier Picks: 7 Best Options for Newborns (2026)
Ready to choose one?
About Graham Fisher
Graham Fisher is part of our editorial team and reviews and edits our baby gear guides, checking product details against manufacturer specifications and owner feedback.









Write Your Review
No reviews yet. Be the first to share your experience!