 By Graham Fisher
A Lictin baby carrier is a soft, adjustable carrier with straps, buckles and a body panel that you fit to your own frame and your baby’s size. Learning lictin baby carrier how to use it is mostly about getting the straps set before your baby goes in, then checking the seat and airway every time. This guide compares the three most common ways to wear this type of carrier, shows the steps for each, and explains what to check so the carrier stays comfortable and safe for you and your child.
Because product versions differ, always read the manual packed with your carrier and follow the manufacturer’s weight and height limits. The steps below describe the general structure of soft structured carriers and are meant as a starting point, not a replacement for those instructions.
Comparison Table: Front, Hip and Back Carry
| Criterion | Front carry (inward facing) | Hip carry | Back carry |
|---|---|---|---|
| Typical starting age | From newborn, once the manufacturer’s minimum weight is met | Usually from around 6 months, when baby can sit unsupported | Usually from around 6 months, with good head and neck control |
| Ease of learning | Easiest for most first-time users | Moderate; needs practice with a stable hip position | Hardest; often done with a helper at first |
| Baby visibility | High, face to face | High, side facing | Low, face toward your back |
| Best for | Newborns, feeding breaks, close contact | Toddlers who want to look around | Older babies, errands, longer walks |
| Load on your back | Moderate, weight sits forward | Lower, weight sits on the hip | Higher spread across the back and hips |
Ease of Learning: Front Carry Wins for Beginners
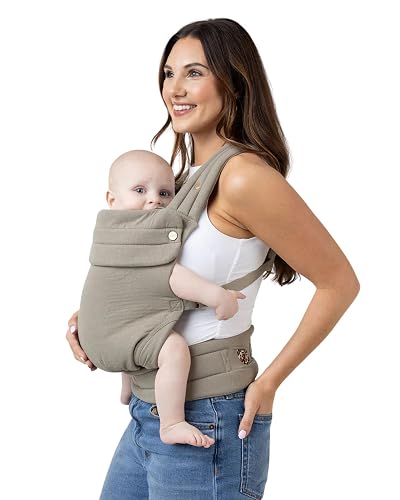
For most people learning how to use a Lictin carrier, the front carry is the simplest starting point. The seat sits high on your torso, you can see your baby’s face at a glance, and you do not need to reach behind your back to finish the buckles. Many owners find they can complete the front carry on their own after a few practice sessions with an empty carrier and a doll or a stuffed toy.
The hip carry asks you to position the seat low on one side and keep your baby’s legs in a secure spread. It takes more coordination, but it is still manageable once you know where the seat should sit on your waist. The back carry is the most demanding. Most instructions recommend practicing with a spotter the first few times, because you cannot see the buckles and you need to reach around your body to tighten the straps.
Winner for ease of learning: front carry. Start here, then add the other positions once your fit is consistent.
Safety and Positioning: Front Carry Needs the Closest Checks
Safe positioning matters in every carry, but the front carry has the most common setup errors because the baby’s face is close to your chest. The general safety guidance used across soft carriers is often summarized as the TICKS checklist, which stands for tight, in view at all times, close enough to kiss, keep chin off chest, and supported back. Check these before every walk and after each adjustment.
- Confirm the baby’s airway is clear. The chin should not press into the chest, and the nose and mouth should be uncovered.
- Check that the baby’s knees sit higher than the bottom and the legs are in a natural spread, not dangling straight down.
- Make sure the fabric supports the baby from knee to knee and the back is held upright, not slumped.
- Pull the straps snug so the baby does not sink lower over time. Recheck after the first ten minutes of walking.
- Look at your baby often, especially if they are sleeping, and make sure they stay visible.
The hip and back carries also need airway and support checks, but they are less likely to bring the baby’s face into direct contact with your body. Owners of many soft carriers say the back carry is the easiest of the three to get wrong in terms of seat height, so check the seat position in a mirror or ask a helper to look before you go.
For a broader safety walkthrough that applies to most soft carriers, see How to Wear Baby Carrier Safely: A Step-by-Step Guide. If you have questions about your baby’s health or development, consult your pediatrician before using a carrier in a new way.
Comfort and Fit: Hip Carry Wins for Older Toddlers
Comfort depends on your body shape, your baby’s weight and how well the straps are adjusted. A good test is whether the weight feels balanced after five minutes of standing. For the front carry, the shoulder straps should lie flat, and the waistband should sit on your hips rather than your waist. For the hip carry, the seat should be low and centered on the side you are using, with the waistband secured firmly enough that the baby does not tip.
Many parents find that toddlers over about 20 pounds become harder to carry comfortably in the front position. The hip carry spreads the weight differently and lets an older child lean back and look around, which helps with longer outings. Owners often report that a hip carry feels better for a child who wants to see the world, though it is less supportive for a sleeping baby.
When comparing carriers in general, this is one reason many buyers look at fit and sizing charts closely. The comparisons in Ergo Baby or Baby Bjorn Carrier (2026): Which Is Better for Daily Use? and Tula Baby Carrier Comparison: Which Tula Baby Carrier Is Best for You? explain how different body styles interact with waist and shoulder dimensions.
Winner for comfort over time: hip carry for older toddlers, front carry for newborns and sleepers.
Versatility: Back Carry Wins for Longer Outings
Once your baby is old enough for a back carry, the weight shifts to your back and hips, which many users find easier on the shoulders during long walks. The back carry also frees the front of your body for carrying bags, using a phone or hugging another child. For errands, travel days and hikes on flat trails, it is often the most practical option.
The trade-off is visibility. You cannot see your baby while you are wearing them in this position, so the first few uses should happen in a low-risk setting. Keep the baby in view by using a mirror or a helper until your technique is solid. If you plan to walk with your baby on sidewalks or trails, the tips in Walking with Baby Carrier: A Step-by-Step Guide for Comfort and Safety cover pacing, footing and how to check the seat on the move.
Winner for versatility: back carry, once the baby and the wearer are both ready.
Adjustability and Sizing: Front Carry Gets the Most Out of Straps
Lictin-style carriers typically use a combination of shoulder straps, a waist belt and sometimes a crossover strap. The more adjustment points you can reach, the easier it is to dial in the fit for a partner, a grandparent or a second caregiver. Front carry is the position where small strap changes make the biggest difference, so it is worth spending time adjusting the shoulder and waist straps while your baby is still in the seat.
Before you start, try these steps for setup:
- Loosen all straps completely and lay the carrier flat so you can see every buckle and panel.
- Put the carrier on with the waistband resting on your hips, not your natural waist, and buckle it.
- Tighten the shoulder straps until the carrier sits high on your chest and the body panel is snug.
- Place the baby in the seat, check the TICKS points, and then adjust the crossover strap until the baby feels held close without pressure on their face.
- Walk for a few minutes, pause, and recheck the seat height and airway.
If your baby is a newborn, check the manufacturer’s newborn insert instructions. Some soft carriers need an insert or a special setting to support a small body, and skipping that step can leave the baby sinking too low in the seat.
Which Should You Choose?
Choose the carry that matches your baby’s age, your experience level and how you plan to use the carrier:
- Newborn to about 4 months: Start with the front carry only. It is the most supportive for small babies and the easiest to check visually.
- First-time users of any age: Practice the front carry with an empty carrier until you can buckle everything in under two minutes.
- Babies who want to look around: Try the hip carry once your baby has solid head and trunk control, usually around 6 months, and only after you have a reliable front carry.
- Long walks, errands and travel: Use the back carry for older babies, ideally with a helper for your first few attempts.
- Shared use between two caregivers: Choose the front carry for the simplest adjustments and write down the strap settings so each caregiver can match them.
- Heavier toddlers or long days: Alternate between the front and hip carry to shift the weight and reduce strain.
If you are still comparing carrier designs, the overviews in Baby First Baby Carrier: How to Choose Your First Carrier and Boppy ComfyFit Baby Carrier Black: 8 Best Options Compared (2026) show how different features affect everyday use.
Recommended Options
Below are real carriers that many parents compare with soft structured designs like the Lictin. Check each product’s weight range and carry positions before buying.
- Ergobaby Omni 360 Cool Air Mesh Baby Carrier: View on Amazon
- Tula Explore Baby Carrier: View on Amazon
- BABYBJORN Baby Carrier One: View on Amazon
FAQ
Can I use a Lictin baby carrier for a newborn?
Many soft structured carriers allow newborn use with an insert or special setting, but only if the manufacturer lists a newborn minimum weight and size. Follow the manual, use the front carry only, and check the airway often.
Which carry position should I learn first?
The front carry is the easiest to learn because you can see the baby and reach all the buckles. Practice it with an empty carrier before you add a baby.
How tight should the straps be?
The carrier should feel snug enough that the baby does not sink or shift when you walk. You should be able to fit a finger or two between the baby’s body and the carrier, and the baby should be held upright, not slumped.
When is it safe to start the back carry?
Most instructions suggest starting the back carry only after the baby has strong head and neck control, often around 6 months, and after you have mastered the front carry. Use a helper for your first tries.
What should I do if the carrier feels uncomfortable?
Check the waistband position first, since it should sit on your hips. Then adjust the shoulder straps and crossover strap. If pain persists, stop using the carrier and talk to a physical therapist or your healthcare provider.
Conclusion
For most readers, the best way to approach lictin baby carrier how to use is to start with the front carry, master the TICKS safety checks, and only move to the hip or back carry when your baby and your technique are ready. Practice with an empty carrier, adjust the straps before the baby goes in, and recheck the airway and seat after every stop. Once you are comfortable with the basics, the carrier becomes a practical tool for walks, errands and quiet cuddles at home.
About Graham Fisher
Graham Fisher is part of our editorial team and reviews and edits our baby gear guides, checking product details against manufacturer specifications and owner feedback.









Write Your Review
No reviews yet. Be the first to share your experience!