 By Graham Fisher
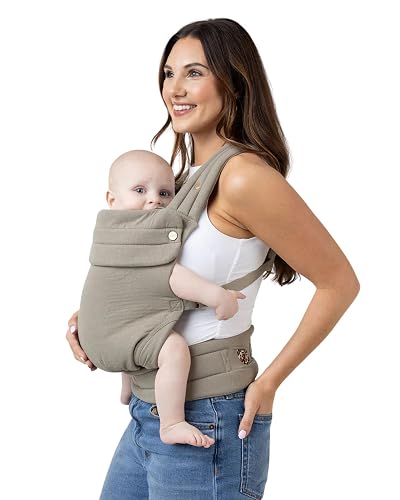
A 3-in-1 baby carrier Babyway is a soft structured carrier that can be worn in several positions, usually front-facing inward, front-facing outward and hip or back carry, depending on your child’s size and your needs. In this guide you will learn how to check whether the carrier fits your body, how to adjust it for different stages, how to position your baby safely, and which mistakes to avoid. Keep the manufacturer’s manual nearby, because specific buckle layouts and weight limits vary by model.
What the 3-in-1 Babyway Carrier Does
Most 3-in-1 carriers combine a newborn insert, a standard front-carry panel and a back-carry option in one body. The idea is that you buy one carrier and use it from the early weeks through the toddler years, rather than replacing it at each stage. Manufacturers typically specify a minimum weight for newborn use with the insert, and a maximum weight, often around 20 to 45 pounds depending on the model, for front and back carries. Check your exact model’s label before you begin, since these numbers differ.
Shopping for one? See our guide: Baby Bjorn Baby Carrier Review: Pros and Cons.
Common Positions You Will Use
- Front-facing-in (face to chest): the standard newborn position, recommended for young babies who need close contact and head support.
- Front-facing-out: used only once your baby has solid head and trunk control and the manufacturer allows it. Many pediatric sources advise against outward-facing carries for very young infants.
- Back carry: generally used once your child can sit independently and hold their head steady, often around six months or later, per the manufacturer’s guidance.
- Hip carry: available on many models for older toddlers who can sit astride your hip with support.
Step 1: Check the Fit on Your Own Body
Before your baby goes in, make sure the carrier fits you. A poorly fitted carrier can strain your lower back and shoulders and can let your baby sit too low or too far from you.
- Stand in front of a mirror and put the carrier on with the buckles fastened loosely.
- Tighten the waist strap so it sits on your hips, not your natural waist, and lies flat with no gaps.
- Adjust the shoulder straps so the padding sits on your shoulders, not on your neck or upper arms.
- Check that the carrier’s top edge does not press into your throat or chest once your baby is inside.
If you have a larger frame or a petite build, you may need to measure your waist and chest and compare them with the manufacturer’s size chart. Some parents find that a different size or a model with more adjustment range works better. If you have back, hip or shoulder pain, speak with a physical therapist or your healthcare provider before relying on the carrier for long periods.
Step 2: Set Up the Newborn Insert Correctly
If you are carrying a newborn, the insert is the piece that does the most work. Its job is to bring your baby up to chest height and support the head and spine.
- Lay the insert flat and confirm which side is the front, usually marked by a label or tag.
- Fasten the insert so the bottom curves up against your baby’s bottom, not straight across.
- Check that the head support is high enough to keep the head from falling forward.
- Never use the insert in a way that pushes your baby’s chin toward the chest.
Tools and Items to Have Ready
- The carrier, with the newborn insert if your model includes one.
- The printed manual or a saved digital copy for your model.
- A mirror for checking the fit and buckle positions.
- A soft cloth or burp cloth to protect the carrier from spit-up.
- A supportive surface, such as a bed or couch, for practicing with a doll or a sandbag before using it with your baby.
Step 3: Position Your Baby Safely
Safe positioning is the most important part of any baby carrier. The commonly taught guideline is the TICKS checklist, which stands for Tight, In view at all times, Close enough to kiss, Keep chin off chest and Supported back. Pediatric organizations recommend following it for every carry.
- Tight: the baby should be held snugly against your body, with no slack in the fabric.
- In view: you should be able to see your baby’s face without leaning down.
- Close enough to kiss: the top of the head should be near your chin.
- Keep chin off chest: leave an open airway by keeping a small gap between the chin and the chest.
- Supported back: your baby’s back should be in a natural, supported curve, not slumped.
After you put your baby in, check the airway again, especially after you bend, squat or walk. Babies can slump as the fabric shifts, so recheck often.
Step 4: Move From Newborn to Toddler Use
As your child grows, you will adjust the carrier rather than replace it. Here is a general progression, but always confirm the stage limits in your manual:
| Stage | Typical Position | Key Check |
|---|---|---|
| Newborn, insert in place | Front-facing-in, with insert | Chin off chest, head supported |
| Early infant, no insert | Front-facing-in | Torso straight, legs in a natural “M” shape |
| Sitting independently | Front-facing-out or back carry, if allowed | Baby’s head steady, weight in range |
| Toddler | Back or hip carry | Buckles snug, waist strap sits low |
Watch for the moment your child’s weight passes the front-carry limit printed on the label. Once they reach it, switch to a back carry if your model allows it, or move to a different carrier.
Common Mistakes to Avoid
- Wearing the carrier loosely so the baby sags into a curled position.
- Forgetting the newborn insert, or using it without adjusting the head support.
- Facing a baby outward too early, before head and neck control is solid.
- Leaving the waist strap too high, which shifts weight onto your shoulders.
- Skipping the airway check after bending or sitting down.
- Ignoring the weight and age limits in the manual.
Tips for Comfort
Wear the carrier before the baby is in it, so you can adjust it without a squirming child. Shift the weight to your hips, not your shoulders, and take breaks when you need them. If you plan to walk for long stretches, you may find it helpful to read Walking with Baby Carrier: A Step-by-Step Guide for Comfort and Safety, which covers pacing and posture on longer outings.
How the Babyway Compares With Other Carriers
Many parents compare multi-position soft structured carriers with wraps and ring slings. Wraps can give more customizable fit for newborns, while structured carriers are usually quicker to put on. If you are deciding between styles, Baby Carrier Types: Structured, Wrap, Ring Sling and Backpack explains the trade-offs in more detail. For a broader look at structured options, Best Baby Carriers: 5 Soft Structured Carriers Compared places several models side by side.
If you are shopping for a first carrier and want help narrowing the field, Baby First Baby Carrier: How to Choose Your First Carrier walks through the main decision points. Parents who want to see how another popular brand handles the same stages can also check Ergo Baby or Baby Bjorn Carrier (2026): Which Is Better for Daily Use?.
Recommended gear
A few accessories can make daily use easier, though none are required.
- Burp cloths: a stack of absorbent cloths protects the carrier fabric from spit-up and drool. View on Amazon
- A carrier-specific hip seat or lumbar support belt: some parents use an added support to spread weight across the hips for longer wear. Check compatibility with your model first. View on Amazon
- A portable changing pad: useful when you need to clean up quickly away from home. View on Amazon
FAQ
Can I use a 3-in-1 Babyway carrier from birth?
Many models include a newborn insert that allows use from birth, but the manufacturer sets a minimum weight and sometimes a minimum length for newborn use. Always check the label and manual before using it with a newborn.
When can I switch to facing my baby outward?
Most manufacturers recommend waiting until your baby has solid head and neck control and can sit with support. Pediatric guidance generally advises against outward-facing carries for very young infants.
How do I know if the carrier fits me?
The waist strap should sit on your hips, the shoulder straps should not dig in, and the baby should sit high on your chest without strain on your back. Adjust in front of a mirror before adding your baby.
What is the TICKS rule?
TICKS is a safety checklist for carrying infants: Tight, In view at all times, Close enough to kiss, Keep chin off chest and Supported back. Check it every time you put your baby in the carrier.
Can I use a back carry for a toddler?
Many 3-in-1 carriers allow back carry once a child can sit independently and hold their head steady, typically around six months or later. Check the weight limit for back carries in your manual.
How often should I wash the carrier?
Follow the care label. Many fabrics are machine washable on a gentle cycle, but some buckles and inserts may need hand washing or air drying. Wash the insert separately if it is removable.
Should I consult a professional before using the carrier?
Yes, if your baby was born early, has a medical condition, or has any concerns about breathing or positioning. A pediatrician, physical therapist or certified carrier consultant can review your setup.
Conclusion
A 3-in-1 baby carrier Babyway can serve you from the newborn stage through the toddler years when it is fitted and used correctly. Start by checking the fit on your own body, set up the insert or positions according to your baby’s size, and follow the TICKS checklist every time. Review the manual for your model’s weight and age limits, and seek professional advice if you have concerns.
Ready to choose one?
About Graham Fisher
Graham Fisher is part of our editorial team and reviews and edits our baby gear guides, checking product details against manufacturer specifications and owner feedback.









Write Your Review
No reviews yet. Be the first to share your experience!