 By Graham Fisher
Updated November 2026
A baby carrier backpack Canada shoppers can rely on comes down to four things: a secure fit for both you and your child, a weight rating that suits your child’s age, padding that holds up through long walks, and a design that works in Canadian weather. This guide walks you through how to measure, compare and test a carrier before you commit, so you end up with a pack you will actually use on the trail, at the grocery store and on winter sidewalks.
Step 1: Confirm the Carrier Type You Actually Need
Backpack-style carriers sit the child high on the back, with the weight carried by the hips and shoulders rather than the front of the body. They suit hiking, travel and longer outings, but they are not always the right pick for newborns. Before you shop, check whether the manufacturer lists a minimum weight or a newborn-compatible insert. If you are still weighing options, our overview of Baby Carrier Types: Structured, Wrap, Ring Sling and Backpack explains where each style fits.
Also note that many backpack carriers are rated for children starting around 7 to 8 kg (roughly 15 to 18 lbs), with some models going up to 18 to 20 kg (about 40 to 45 lbs). Manufacturers specify these ranges, so always read the label rather than relying on a general guess.
Step 2: Measure Your Torso and Your Child’s Weight
Fit starts with your torso length and waist, not your clothing size. Most backpack carriers adjust across a range of torso lengths, and manufacturers publish charts showing the measurements each size covers. Measure from the base of your neck to your waist (roughly the tie line of an apron) and record your waist circumference at the navel.
Record your child’s current weight as well. A carrier that feels fine at 8 kg may feel awkward at 14 kg if the hip belt does not transfer load well. Choose a model whose upper weight limit gives you room to grow.
Step 3: Check the Hip Belt and Load Transfer
The hip belt does most of the work on a backpack carrier. A good belt sits on the iliac crest (the top of the hip bone), not on the waist, and wraps firmly enough that you can feel the weight moving down to your hips. Look for a belt with a wide, padded surface and a buckle you can operate with cold or gloved hands, which matters a lot in Canadian winters.
Put the carrier on with the child in place and tighten the shoulder straps first, then the hip belt. The child should sit high enough that their head is close to your shoulder level, with their bottom supported and their knees slightly above their seat.
Step 4: Evaluate Weather Protection for Canadian Conditions
Canadian weather ranges from wet spring drizzle to deep cold and wind, so check how the carrier handles both. Fabric weight, water resistance and whether the carrier accepts a rain cover all affect how well it performs. If you plan to hike in wet conditions, our roundup of 7 Best Baby Backpack Carrier Rain Covers for Wet-Weather Hiking (2026) covers options that work well with most backpack designs.
In cold weather, keep in mind that you will likely wear the carrier over or under a winter coat. Check whether the carrier fits over a parka with the straps still adjustable, and whether the child can be covered without overheating. Dress your child in layers and avoid placing thick snowsuit padding behind their back, since it can reduce proper positioning.
Step 5: Confirm Positioning and Airway Safety
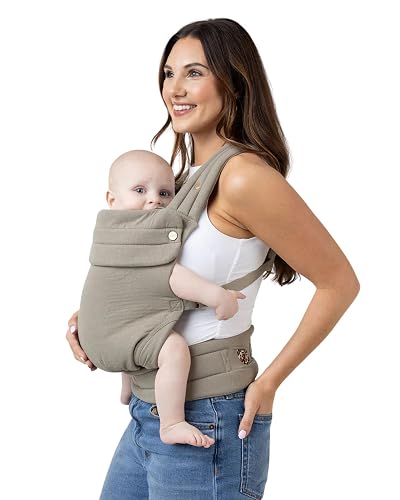
Safe positioning matters more than any feature list. The child should face you or be positioned on your back in a way that keeps the chin off the chest and the airway open. Their spine should be supported in a natural curve, and their knees should be higher than their bottom in an M-shaped position. You should be able to kiss the top of their head without leaning down.
Check the position every time you adjust the carrier, and especially after the child falls asleep, since heads can slump forward. Our comparison of Proper Baby Carrier Position vs Wrong Position: Which Should You Choose? walks through what correct and incorrect setups look like.
Step 6: Test Comfort Over Time
Spec sheets do not reveal how a carrier feels after 45 minutes. If you can, try the carrier with your child’s weight, or a sack of similar weight, and walk around for at least 15 minutes. Pay attention to pressure points on your shoulders, back and hips, and check how easy it is to get the child in and out.
Owners often report that padding and strap width make the biggest difference on longer days. Wider, contoured straps distribute load more evenly, and a breathable back panel reduces sweat in warmer months.
Step 7: Check Durability, Warranty and Returns
Look at the stitching, the buckle hardware and the zip quality. Metal hardware usually outlasts plastic on frequent use, and reinforced stress points at the strap anchors matter for carriers that will see daily use. Read the warranty terms and the return policy before you buy, particularly if you are ordering from a retailer outside Canada and need to think about duties, shipping and sizing exchanges.
Quick Checklist Before You Buy
- Confirm the child’s current weight falls within the manufacturer’s stated range.
- Measure your torso length and waist and match them to the size chart.
- Check that the hip belt is padded and operable with gloves.
- Confirm the carrier accepts a rain cover or weather accessory if you need one.
- Verify that the seat keeps the child’s knees above the bottom in an M-shape.
- Test the carrier with weight for at least 15 minutes if possible.
- Read the warranty and return policy for Canadian purchases.
Common Mistakes to Avoid
- Buying by age alone. Children grow at different rates, so weight and torso fit matter more than a birth-month guideline.
- Ignoring the hip belt. Carrying weight on the shoulders causes fatigue and back strain quickly.
- Skipping the weather check. A carrier that is comfortable in July may be miserable in a Canadian January or a May downpour.
- Forgetting to recheck position. A child can slump over time, so check their airway and alignment during each outing.
- Overlooking returns. Sizing is easier to get right when you know how to exchange or return a carrier that does not fit.
Tips for Using Your Carrier Day to Day
Practice putting the carrier on and taking it off before you need it, ideally with the child in it. Once you are comfortable with the routine, you will spend less time fumbling at the car or in a crowded airport. Keep a spare set of layers and a small first aid kit in an outside pocket, and check the carrier for loose threads or worn buckles every few weeks.
If you travel by air, our guide to Backpack Baby Carrier Airplane: How to Fly With Your Baby Hands-Free covers security checks and boarding tips that apply to most backpack carriers.
Recommended gear
A few accessories make a backpack carrier more practical in Canadian conditions. These are commonly used alongside backpack carriers.
- Rain cover for backpack carriers: A fitted cover keeps the child dry in wet weather and blocks wind during spring and fall walks. View on Amazon
- Insulated carrier cover or bunting: A cover designed to fit over a backpack carrier helps keep the child warm in cold weather without adding bulk behind the back. View on Amazon
- Carrier-friendly sun hat with neck flap: Protects the child’s head and neck during summer hikes and outdoor outings. View on Amazon
FAQ
What is the minimum weight for a baby carrier backpack?
Many backpack carriers start at around 7 to 8 kg (roughly 15 to 18 lbs), but this varies by model. Some carriers offer newborn inserts for smaller infants. Always check the manufacturer’s stated minimum before use.
Are backpack carriers safe for newborns?
Some are, but many are designed for older babies who can hold up their heads. If you are considering a backpack carrier for a newborn, confirm the manufacturer’s guidance and consult your pediatrician or a certified baby carrier educator.
How do I know if the carrier fits me?
Measure your torso length and waist, then compare them to the manufacturer’s size chart. The hip belt should sit on your hip bones, and the shoulder straps should not dig in. Test the fit with the child in place and walk around for several minutes.
Can I use a backpack carrier in winter?
Yes, but check that the carrier fits over your winter coat and that the child can be dressed in layers without overheating. A fitted insulated cover can help in very cold conditions.
How do I keep my child safe while carrying them?
Keep the child’s airway clear, their chin off their chest, and their knees above their bottom. Check position regularly, especially when the child falls asleep. Consult a pediatrician or certified educator if you have concerns about positioning.
Do I need a rain cover for my carrier?
If you plan to walk or hike in wet weather, a rain cover is useful. It keeps the child dry and blocks wind. Make sure the cover is compatible with your specific carrier model.
How often should I check my carrier for wear?
Inspect the straps, stitching, buckles and zippers every few weeks, and more often if you use the carrier daily. Replace any carrier with frayed straps or damaged hardware, and follow the manufacturer’s care instructions.
Is a backpack carrier better than a front carrier?
It depends on your needs. Backpack carriers move weight to the hips and shoulders, which suits longer walks and hikes. Front carriers offer easier access to the child and may suit younger babies better. Many parents own both.
Conclusion
Choosing a baby carrier backpack Canada families can use comfortably comes down to checking the weight rating, measuring your torso, testing the hip belt and confirming safe positioning. Add weather protection that suits your region and a warranty you can rely on, and you will have a carrier that works from the first spring walk to the last winter errand. Take your time with the fit, and do not hesitate to exchange the carrier if it does not sit right.
Ready to choose one?
About Graham Fisher
Graham Fisher is part of our editorial team and reviews and edits our baby gear guides, checking product details against manufacturer specifications and owner feedback.






Write Your Review
No reviews yet. Be the first to share your experience!