 By Graham Fisher
Updated November 2026
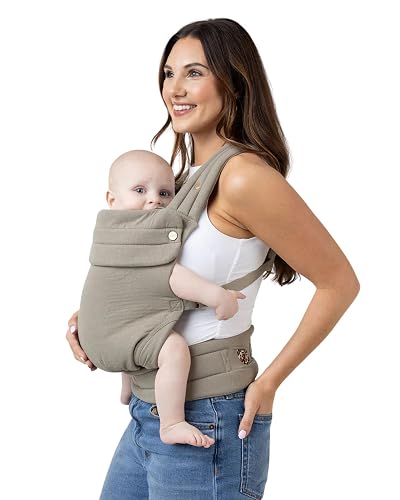
A baby wrap carrier sling is a long piece of stretchy or woven fabric that wraps around your torso and supports your baby against your body. In this guide, you will learn how to pick the right type of baby wrap carrier sling for your body and baby’s age, how to get a safe fit, and how to tie a basic front carry with a secure, supported seat. Each step includes a check you can run before you walk out the door.
What a Baby Wrap Carrier Sling Is and Who It Suits
A wrap is a single piece of fabric, usually four to six meters long, with no buckles or rings. You adjust it by tying knots and passing fabric around your back, shoulders and waist. Wraps are popular with new parents because they distribute weight across the back and shoulders and can be tightened in small increments. They also pack flat and fold small, which helps if you travel often.
Shopping for one? See our guide: 8 Best Baby Carrier Sling Wrap Pouch Options for Newborns and Toddlers.
Wraps are not the only option. If you want something faster to put on, a ring sling or a structured carrier may fit your routine better. For a side-by-side look at the main categories, see Baby Carrier Types: Structured, Wrap, Ring Sling and Backpack. If you are still deciding between a wrap and a ring sling specifically, How to Tie Baby Carrier: Wrap vs Ring Sling, Which Should You Choose? walks through the trade-offs.
Step 1: Choose the Right Type of Baby Wrap Carrier Sling
Wraps come in three main fabric types, and each behaves differently once tied:
- Stretchy wraps are made from knit fabric, often cotton or a cotton blend with elastane. They hug the body closely and are generally used for newborns, roughly up to about 15 pounds, because the snug, close fit supports a baby with little head control.
- Woven wraps have little or no stretch. They are more supportive over time and are often used from birth through toddlerhood, with the ability to carry larger babies on the back.
- Hybrid wraps blend some stretch with some structure, offering a middle ground for parents who want flexibility.
Manufacturers commonly specify weight and age ranges for each product. Check the label for the minimum and maximum weight, and confirm that the carrier supports the front, hip and back positions you plan to use.
Step 2: Measure Your Fabric and Check Your Body Fit
Length matters more than most first-time buyers expect. A wrap that is too short will leave you struggling to finish the knots, while one that is too long will pool fabric at your waist. Many brands list a size chart based on height or dress size, so match your measurements to the chart before ordering.
Before you tie anything, stand in front of a mirror and check these points:
- The fabric should reach from your shoulder blade to the back of your knee, with enough left over to tie.
- Your baby’s bottom should sit at about the level of your belly button when worn on the front, not drop down toward your hips.
- You should be able to see your baby’s face without leaning forward.
Step 3: Gather Your Tools and Prepare the Space
You do not need special tools, but setting up a few things first makes the process smoother:
- A clean, flat area where you can wrap without tripping over the fabric
- A mirror, or a helper who can check the back and shoulders for you
- A fully dressed baby with clothing that does not bunch or pinch under the fabric
- A plan for how you will get your baby in and out, such as a practice run while holding a doll or a bag of similar weight
Step 4: Learn a Basic Front Carry Step by Step
The front carry is the most common starting point. The steps below describe a general approach; the exact knot pattern varies by brand and fabric, so follow your manufacturer’s instructions for the specific wrap you own.
Set Up the Wrap
- Center the middle of the fabric on your back, with the two ends hanging evenly at your sides.
- Cross the ends over your shoulders, bringing them forward to your chest.
- Tie a first knot at your upper back or lower back, depending on the wrap design, to anchor the fabric.
Create the Seat
- Lower your baby into a seated position facing you, with knees drawn up and bottom sitting low in the fabric.
- Pull the fabric under your baby’s bottom so it supports from knee to knee, forming a seat.
- Check that the fabric runs from the back of one knee to the back of the other, not just across the bottom.
Secure and Finish
- Bring the remaining fabric up the back and secure it with a second knot or a tuck, depending on the design.
- Adjust the shoulder straps so they sit flat, not twisted.
- Test the carry by bending slightly at the knees and walking a few steps. The baby should feel held close, with no sliding.
Step 5: Use a Safe Positioning Checklist Every Time
Most safety guidance for baby carriers comes down to the same idea: a baby’s airway must stay open, and the baby must remain visible and close enough to kiss on the top of the head. A commonly used guideline is the TICKS acronym, which stands for Tight, In view at all times, Close enough to kiss, Keep chin off chest, and Supported back. Run through it each time you put your baby in the wrap.
| Check | What to Look For |
|---|---|
| Tight | Fabric snug against your body, no slack pulling the baby away |
| In view | You can see your baby’s face without lowering your head |
| Close enough to kiss | Baby’s head is near enough to kiss the top |
| Keep chin off chest | Chin lifted, airway clear |
| Supported back | Baby’s back is curved and supported, not slumped |
For more on comparing good and poor setups, Proper Baby Carrier Position vs Wrong Position: Which Should You Choose? shows what to look for in real-world examples.
Step 6: Adjust for Growth and Different Ages
A newborn needs a very different fit from a toddler. Newborns usually need a snug, close, upright wrap with the fabric pulled firmly under the bottom and up the back. As your baby grows, you may want a looser seat for comfort and a wider fabric path. Once your baby can hold their head steady and sit upright, the hip or back carry becomes an option, though these need more practice.
Recheck your tie every time you put your baby in the wrap. Fabric can loosen after a few minutes of walking, and a baby who is growing quickly may need a small change in position.
Common Mistakes to Avoid
- Leaving slack in the fabric. Loose wraps let the baby sink and can hide the face. Tighten before you walk.
- Carrying the baby too low. A baby sitting low on the belly pulls your back forward. Raise the seat so the bottom sits near your belly button.
- Forgetting to check the airway. Chins pressed to the chest can restrict breathing. Keep the chin lifted.
- Skipping practice. Try your first few carries at home, sitting or standing, before going out.
- Using a stretchy wrap for an older baby. Stretch wraps can lose support as a baby gets heavier. Check the weight limit.
- Ignoring your own comfort. If you feel pain in your back or shoulders, re-tie the wrap or adjust the fabric. Persistent pain is worth raising with a pediatrician or physical therapist.
Tips for Better Everyday Wear
- Practice tying with a doll or a sack of similar weight until the knots feel automatic.
- Keep your wrap clean and check for thinning, fraying or loose stitching at the ends.
- Dress your baby in thin layers, since fabric adds warmth.
- Use a mirror or ask someone to check the back of the wrap when you first learn.
- Rewrap after feeding or naps, since babies shift as they settle.
Recommended gear
These items are commonly used alongside a wrap and can make early practice easier. Always confirm compatibility with your chosen carrier.
- A weighted doll or practice bag. Useful for rehearsing knots and seat height before the real carry. View on Amazon
- A full-length mirror. Lets you check the back and shoulder straps without a helper. View on Amazon
- A breathable cotton layer. Can help manage warmth under the fabric in warmer months. View on Amazon
FAQ
Is a baby wrap carrier sling safe for newborns?
It can be, when the baby is positioned upright with the chin off the chest, the airway clear and the baby visible at all times. Many manufacturers specify a minimum weight or age for each wrap, so check the label. If you have concerns about your newborn’s breathing or positioning, consult your pediatrician.
How long does it take to learn to tie a wrap?
Most parents need several practice sessions before a front carry feels comfortable. Practicing with a doll or a weighted bag at home usually helps more than learning in a rush.
Can I use a baby wrap for hip or back carries?
Many woven wraps support hip and back carries, but these are typically for babies who can hold their head steady and sit upright. Follow the manufacturer’s guidance and practice on the front first.
What is the difference between a stretchy and a woven wrap?
A stretchy wrap is knit and hugs the body closely, which suits newborns. A woven wrap has little stretch and tends to offer more structure, which many parents prefer as the baby grows.
How do I know if the wrap is too loose?
If the baby sinks, slides down, or you can no longer see their face without bending, the wrap is likely too loose. Tighten the fabric and recheck the TICKS checklist.
Can I wash my baby wrap carrier sling?
Most manufacturers recommend machine washing on a gentle cycle and air drying. Always check the care label, since fabric blends and dyes can vary.
Should I replace my wrap as my baby grows?
Not always. Woven wraps often work from birth into toddlerhood, but stretchy wraps may need replacing once the baby passes the weight limit or the fabric loses its support.
Conclusion
A baby wrap carrier sling works best when you match the fabric to your baby’s age, measure for a good fit, and tie each carry with the same safety checks. Practice the basic front carry before you rely on it, and recheck the fit whenever you adjust or put your baby back in. With a few rehearsals and a habit of running the TICKS checklist, you can wear your baby comfortably and safely.
Related reading
- Stretch Wrap Baby Carrier Picks: 7 Best Options for Newborns (2026)
- Ring Sling Baby Carrier Positions: A Step-by-Step Guide for Safe Wear
- Newborn Baby Wrap Carrier: How to Choose, Wrap and Use It Safely
Ready to choose one?
About Graham Fisher
Graham Fisher is part of our editorial team and reviews and edits our baby gear guides, checking product details against manufacturer specifications and owner feedback.









Write Your Review
No reviews yet. Be the first to share your experience!