 By Graham Fisher
Updated November 2026
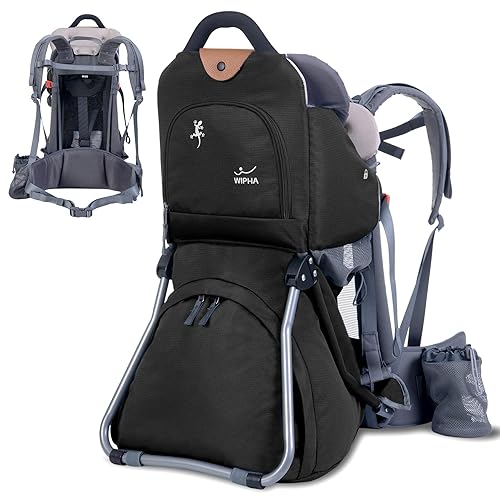
A Clevr cross country baby backpack hiking carrier is built to move a toddler or young child over longer trails while keeping the load balanced on your hips and shoulders. This guide explains what the carrier is designed for, how to fit it to your body and your child, how to check it before each hike, and where parents most often run into trouble. By the end, you will know how to decide whether it suits your trips and how to use it safely.
What the Clevr Cross Country Carrier Is Designed For
Backpack-style carriers differ from front carriers and soft wraps in one important way: most of the weight rides on a padded hip belt and a rigid or semi-rigid frame rather than on your shoulders alone. Parents who hike with a child usually want a carrier that handles changing terrain, gives the child a view, and stays stable when you climb or step over roots. The cross country style, with a frame that sits closer to your back and a deeper seat, is generally aimed at longer days than a light city carrier.
Shopping for one? See our guide: 7 Best Baby Backpack Carrier Rain Covers for Wet-Weather Hiking (2026).
Before you buy or use one, check the manufacturer’s stated weight limit for the child and for the carrier as a whole. Manufacturers typically list a maximum child weight, often in the range of 40 to 50 pounds for backpack models, and a maximum seat height. Stay within those numbers. If your child is near the top of the range, a shorter hike with more breaks is a safer plan than pushing the limit.
Step 1: Check the Fit Before Your Child Gets In
Most fit problems come from skipping this step. Set up the carrier on a flat surface and adjust it for your body first, then bring your child in.
- Loosen all straps completely. Lay the hip belt flat so the padded section sits on your iliac crest, the bony top of your hip.
- Adjust the frame length or torso height using the manufacturer’s marked settings. Measure from your C7 vertebra (the bump at the base of your neck) down to your waist, and compare that with the carrier’s torso range.
- Tighten the hip belt first. It should carry most of the weight. Snug it until it does not slide when you bend forward.
- Tighten the shoulder straps so they rest on your shoulders without pulling the carrier away from your back.
- Adjust the load lifters, the small straps angled from the top of the shoulder straps to the top of the frame. Set them to pull the load close to your body, usually at about a 45-degree angle.
Measuring Your Torso
Have someone measure you if you can. Stand up straight, have them find the bump at the base of your neck, and measure down the spine to the top of your hip belt position. Write the number down. Carrier torso ranges are usually given in inches, so a measurement taken in centimeters may need converting.
Step 2: Seat Your Child Correctly
Once the carrier fits you, get your child in with the same care.
- Make sure your child can sit upright with their back against the seat and their legs through the leg openings, not caught on the fabric.
- Check that the head and neck are supported. Older toddlers should be able to hold their head up without slumping forward.
- Buckle the harness and tighten it until it is snug. You should not be able to pinch excess webbing at the shoulders.
- Position the child’s hips in the center of the seat so the weight is balanced. A child leaning to one side will shift your center of gravity.
Many parents find it easier to put the child in while the carrier is on a bench or stump, then lift it onto their back with the hip belt already loosened. Lift with your legs and keep the carrier close to your body.
Step 3: Walk and Test Before the Trail
Take a short walk on flat ground before heading to the trail. Pay attention to how the load feels when you bend, step up, and turn. If the carrier swings or pulls backward, tighten the load lifters a little and check the hip belt again. Walk for five to ten minutes and then stop to check the straps, since they often loosen slightly during the first walk.
Step 4: Plan Your Trail Days Around the Child
Hiking with a child in a carrier adds weight, reduces your visibility of the trail, and changes how you handle balance. Plan with these factors in mind.
| Factor | What to plan for |
|---|---|
| Distance | Shorter loops with a turnaround point are easier than long point-to-point hikes. |
| Elevation | Steep climbs load your back and hips more. Schedule rest stops every 20 to 30 minutes on grades. |
| Weather | Pack a rain cover, sun shade and extra layers. Check the forecast before you leave. |
| Child comfort | Offer water, snacks and short walk breaks. Stop if the child becomes fussy or overheated. |
| Your energy | Carrying 30 to 40 pounds total adds real effort. Eat and drink more than you normally would. |
Common Mistakes to Avoid
- Loading the shoulders instead of the hips. If the shoulder straps are doing most of the work, the hip belt is too loose or the carrier is too high.
- Ignoring the child’s position on the trail. Check on your child every few minutes. A slumped head or a child who has slid to one side needs immediate adjustment.
- Skipping the pre-trip check. Buckles, stitching and frame connections should be inspected before every use, not just the first time.
- Using the carrier beyond its stated limits. Exceeding the child weight or torso range can compromise stability.
- Overpacking the pack pocket. Heavy items placed high or far from your back shift your balance backward and make the carrier harder to control on rough ground.
Tips for Better Comfort on Longer Hikes
- Stop every 20 to 30 minutes on climbs and let your child stretch their legs. Unbuckle only if you are standing on level ground and can support them.
- Keep a small water bottle in a side pocket so you can drink without removing the carrier.
- Use the load lifters again after each stop. Straps stretch and settle as you walk.
- Carry a small first aid kit with sunscreen, adhesive bandages and any medications your child normally uses.
- If your child has a medical condition, has recently been ill, or has any concern about hip or spine development, consult a pediatrician or other qualified professional before hiking.
Recommended gear
A few extras make trail days with a child in a backpack carrier more practical. The items below are general hiking accessories rather than replacements for the carrier itself.
- A rain cover sized for your specific carrier model keeps your child dry and blocks wind during cold days. View on Amazon
- A sun shade or canopy protects your child’s face and eyes from direct light on exposed trails. View on Amazon
- A hydration bladder or bottle holder keeps you drinking regularly without stopping to dig in your pack. View on Amazon
- Trekking poles help you keep balance on steep or uneven ground when carrying extra weight. View on Amazon
FAQ
Is a Clevr cross country baby backpack hiking carrier suitable for newborns?
Most backpack carriers are designed for toddlers who can hold their head up and sit unassisted, often starting around six months or later. Newborns need head and neck support that these carriers do not provide. Check the manufacturer’s minimum age and weight before use.
How much weight can I carry on the trail?
Follow the stated maximum child weight and the carrier’s total load limit. Many parents also keep their overall pack weight, including the child, water and gear, at a level they can comfortably carry for the whole hike.
How do I know if the hip belt is positioned correctly?
The padded section should sit on your hip bones, not your waist or stomach. When you tighten it, most of the carrier’s weight should feel supported at your hips, not your shoulders.
Can I use the carrier for everyday walks as well as hiking?
Yes, many parents use backpack carriers for errands and walks. Always do the same fit check, and be aware that the frame may feel bulky in tight spaces or on public transit.
How often should I inspect the carrier?
Inspect it before every use. Look at buckles, stitching, straps and frame joints. Replace any part that is frayed, cracked or no longer locks securely, and follow the manufacturer’s care instructions.
What should I do if my child seems uncomfortable on the trail?
Stop in a safe spot, check the harness, adjust the head and neck support, and offer water or a snack. If the discomfort continues, end the hike and return to the trailhead.
Do I need special training to use a backpack carrier on hard trails?
Practice on easy terrain first. Learning how the carrier shifts your balance on stairs, slopes and uneven ground helps prevent falls. If you are unsure, a parent-focused outdoor class or a conversation with an experienced hiker can help.
Conclusion
A Clevr cross country baby backpack hiking carrier works best when the fit is set correctly, the child is seated securely, and the hike is planned around both of your needs. Take the time to measure your torso, load the hips rather than the shoulders, and test the setup on flat ground before the trail. Check the carrier every time you use it, respect the stated weight limits, and talk to a pediatrician if you have any health concerns.
Related reading
- Cross Country Ski with Baby in Carrier: A Step-by-Step Guide for Beginners
- 7 Best Front Backpack Baby Carriers for Hiking and Everyday Use (2026)
- 6 Best Eddie Bauer Backpack Baby Carriers for Hiking and Travel (2026)
Ready to choose one?
About Graham Fisher
Graham Fisher is part of our editorial team and reviews and edits our baby gear guides, checking product details against manufacturer specifications and owner feedback.



Write Your Review
No reviews yet. Be the first to share your experience!